| A Complete Sig From Start To Finish
Now we are going to add one of the images from the .zip file
Open up the image '08.tga' which is an Abstract I've made in Cinema 4 D
Drag this image onto your sig to get something like this (you'll notice this is now called 'Layer 3'):
With 'Layer 3' selected go to the drop-down menu in the 'Layers Palette' and select 'Luminosity'. Now the Sig is really start to take shape!
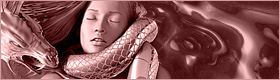
Now we can add another image. Open up the image '01.tga' and drag that into your sig (Layer 4) and again using the drop-down menu in the 'Layers Palette' select 'Luminosity':
Now let's add a little 'sparkle' to it! Make a new Layer: 'Layer - New - Layer...' (Shift + Ctrl + N). This will be 'Layer 5'. Select the 'Paint Brush' and choose Brush #59. Make sure 'White' is selected as the top colour to use:
With the paint brush selected just click once in two areas on the sig where it is lighter:
With 'Layer 5' still selected go to the 'f' at the bottom right and select 'Outer Glow':
Use the following settings:
Your image should now look something like this!:
<- Back Next ->
Back To Sig Tutorials
|