| A Complete Sig From Start To Finish
Open up the 2 images contained in the .zip file in Photoshop
Make a new image 400 x 110 pixels with a white background (mode RGB color)
Make a new Layer: 'Layer - New - Layer...' (Shift + Ctrl + N):
Leave the settings exactly as shown below:
Now we are going to work on the first layer. I do this layer with the majority of my sigs as it makes a nice background to work with
1. Make sure the color swatch is set to black on white
2. Make sure 'Layer 1' is selected in the 'Layers Palette'
3. Now go to: 'Filter - Render - Clouds'
The result should be something like this:
Now go to: 'Filter - Render - Difference Clouds':
The image will now look darker. Do this once more using 'Ctrl + F' and you'll get something a little similar to this:
Now make another new Layer (Layer 2): 'Layer - New - Layer...' (Shift + Ctrl + N):
This layer we are going to fill with a colour. I've chosen a blue: #2C5085
Select the 'Paint Bucket' Tool and fill in the image:
Now for the fun part!
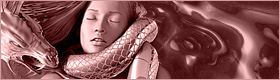
Go to the 'Layers Palette' and on the drop-down list select 'Color':
Your image should now look something like this:
<- Back Next ->
Back To Sig Tutorials
|