| Quick & Basic Border Tutorial
Open up your designed Sig or.psd file in Photoshop
Make a new image the same size as your original and with a white background (mode RGB color)
If you have used a .psd file make sure to flatten the original image:
Now drag your original image into the new one and make sure the new layer is the one selected before proceeding through the next steps
Select the 'Rectangular Marquee Tool'
> |
Now draw out a rectangle in your new image approx 1 pixel in from the edge
You will see a dotted line showing the rectangle shape:
Now for the slightly tricky bit...
Press 'Ctrl' + 'Shift' + 'I' - this will invert the marquee
Press 'Backspace' - this will delete the marqueed area
Press 'Ctrl' + 'D' - this will deselect the marquee tool
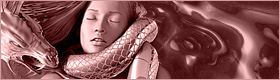
Now should have a white border around your sig:
You can obviously change the 'Background' to any colour you wish so that you have different colour borders. You can also use the 'Gradient Tool' as well as other great effects available in Photoshop. Just play around with your settings to get the desired effect.
<- Back
Back To Beginning Of Tutorial
Back To Sig Tutorials
|